Woven Shibori: Practice Round - Ding!

I don't normally do test runs of things I make. I just like to dive into something and hope for the best. More than likely, it comes out just fine. And if not, then that becomes the test piece. It's a win-win.

My newest obsession is shibori, which for those of you who might not know is the Japanese art of resist fabric dying. In the states, tie-dyeing t-shirts is the closest thing we know, taken from one type of shibori (kanoko). Other methods of shibori include: pole wrapped (arashi), pleated (suji), clamped (itajime), and stitched (nui). I could go on and on about this stuff, but today I'll only bore you with the stitched method.

In basic terms, stitched shibori is where you take a needle and thread to some fabric, make a loose running stitch then pull the thread tightly resulting in scrunched, bunched fabric. The folds created, if done properly, will be tight enough to resist the dye bath resulting in a pattern.  

Recently I discovered a book at the library called Woven Shibori which takes this theory and it applies it to the loom. But instead of hand stitching in the thread, I weave it into the cloth. How genius is that?! I'm so fascinated by this that it's taken over my weaving project thoughts. And since I've never done this (not even hand stitched fabric shibori), I have no idea what it's going to do to the fabric. Which is why I decided to do some actual test pieces.

I used some variegated cotton thread that I've had sitting on the shelf for years. I have no clue as to why I bought it. I really hate variegated yarn because it never gives you the result you think you'll get. I figured it would be good practice yarn. I think I was right since the resulting fabric is so ugly.

I decided to go even further with the test piece and even added some wool threads. The plan is to dip the end into boiling water; the hot water should shrink the wool but not the cotton and it should naturally pucker. We'll see how that goes.

So this is what the test piece looked like B.D. (before dyeing):

This is what it looked like A.D. (After Dyeing):

Why was I so shocked that it didn't take up much dye? Because of all the pre-dyed fibers I've dealt with, usually can be over-dyed. But then I realized that all the fiber I've over-dyed has been protein based. Darn you animal fibers! You take dye so well! You strike again! 

Time to take out the stitches and see what I get!

For the Love of Tools: Part 1

I've decided that I need to share with you all how much I love a good tool. (Insert joke here. Go ahead - once you're done laughing we can continue.) There is nothing like a well made tool that gets the job done. I am so convinced that there are cases where if you don't have the right tool, you shouldn't even bother tackling certain projects. This series will span a number of different tools and the reasons I love them. Ridiculous, I know, but it's one thing I am very passionate about.
When attempting to take apart my upholstery project, I came across a square screw head. It's been a while since I've seen one of these and started to fret that I wouldn't have a screw driver to deal with the situation. I even dreamt that I didn't have the right tool and none of my friends did either. And now you know that I have really boring dreams.

Enter: my handy-dandy Tim Allen Signature Tools screw driver set from the early 1990's, which I stole from my father. Yes, this screw driver was sold under the Tim 'The Tool Man' Taylor Home Improvement advertising scheme. What's even more baffling to me is that my dad would buy something labeled as such. (Perhaps my mom bought it??)

Why do I love this particular screw driver, even though I have one very similar to it and it has a ridiculous label that has (thankfully) almost rubbed off? Fourteen different screw heads of various sizes and shapes all neatly arranged in the handle of the screw driver. No fumbling for where you put the different interchangeable bits. It's sturdy, made of heavy plastic. It has saved my ass and solved many problems in the last 20 years or so and has possibly saved a relationship or two (assembling the IKEA couch with my honey). It has yet to save a life, but there is time Tim Allen screw driver. There is time.

Upholstery 101

When I was little, these stackable foot stools provided endless entertainment and hosted many a tea party. As you can see, they are circa 1970 when pleather was it. My parents bought them from Ethan Allen and they have held up quite well to all kinds of beatings over the years, although it's time for an update. I'm taking them to an upholstery class at the 3rd Ward to redo. More updates as the project progresses!

Soak yourself clean...

So I did it all. I washed and scoured part of the sheep fleece and a small portion of the alpaca I was so generously given. A messy job, but not as difficult as I originally thought it would be. 
Below are the basic steps to how I scoured the fleece I received.  I used medium sized lingerie bags with large mesh holes. I think large holes were important given that there was so much VM (vegetable matter, that is); they were imperative for allowing all the junk to fall through while containing the locks in the bag. 
The one downer to all this is the amount of water I had to use. I'm thankful that our apartment has scalding hot water straight out of the tap, but I had a strange sense of guilt from using so much. For the first small batch - my test batch - I used my handy 4 gallon OXO bucket. 

I gave the wool two 5 minute soaks in separate hot water baths. I didn't even add detergent at this point. The first two rinses were so dirty, it didn't seem worth while - the second the bag hit the bucket the water turned the color of mahogany or maybe the color of an espresso with nothing added. And this is after I did some intense skirting on this fleece, so no, there weren't any poop tags or muddy locks. I will spare you the first rinse picture.

Fi really had the need to watch the whole process. She had the best seat (and view) in the whole place.

Now comes the detergent. I used regular ol' Dawn liquid dish soap because that is what everyone on the interwebs suggested. I guess if it can clean an oily penguin, it can get lanolin out of some locks.

Then another rinse. Although this one looked a little dirty still, so I repeated the soap soak followed by two clean water soaks. 
Socks couldn't stop watching either. And they were obsessed with the cloth bags I was storing the fleece. (Oddly they didn't want to have anything to do with the cleaned wool.) Before I washed them, the bags smelled like a clean barnyard because I had added lavender packs to the bags to keep away moths and other insects. Classy. Socks wanted to sleep on them!

After the last rinse, I let the bags drain then rolled the wool on a towel to get out the excess water, similar to how I would clean a wool sweater. The result? Clean locks! You can still see some VM, but look how white they turned out! I can pick out the big VM, but the rest will (hopefully) come out when I pick and card it.

After the small test batch, I tackled the whole of it. Somehow I timed it perfectly to be drying in the afternoon sun! 

And the scouring begins!

Today I am dedicating my time to scouring small bits of the wool I received from the infamous sheep shearing.

I bought a few provisions at Bed Bath & Beyond. Spent a lot of time in the beyond section, but came out with fine mesh stainless steel strainers so as not to fully clog our bath drain. I'm hoping the mesh bags will help with containing the locks. We'll see!

Set up the fiber drying rack, and I've got my helper side-kick. I think we're ready to go.

Wish me luck.

Level Up!

.
When my significant other left for a work trip, he is gone for a such a long time I decided to rearrange my loom. It now sits right in front of the window so I can get a little more sun and enjoy the view. Except I found out what it means when your loom isn't level! Your beater doesn't beat in a straight line!

Ooof.

Unfortunately, I was so in the zone I missed this and part of my fabric is total junk. I guess I also found out our apartment is quite slanted. Wasn't there a How I Met Your Mother episode about this?!?

DIY Weaving Paddle

I was watching a weaving video the other day. Yes, I watch weaving videos. Now that we've all stopped laughing, I watched the woman in the video demonstrate a paddle. To put it simply for those who don't weave, paddles can speed up your warping time because they allow you to warp several threads at a time. They do other things, like create stripped warps quickly too, but I won't go into it. Just know that they are a time saver. Anyway, they look like a rigid heddle, which looks like this:
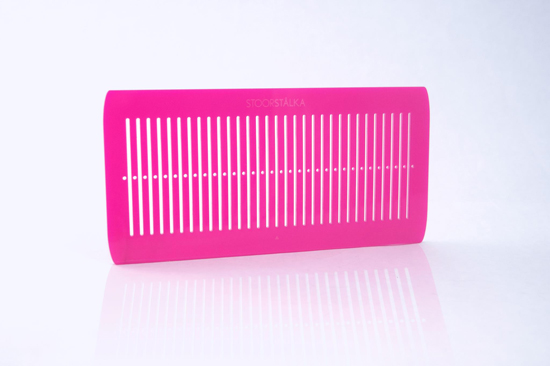
I've never used one, but wanted to try one, but didn't want to buy one. They're pricey, it would take a while to arrive because I'd have to mail order it, and who knows if I'd even like to use it. It also seemed like something I could make. So I decided to put my creative problem solving to the test. Since I don't have access to a super stocked prototyping shop anymore, I often find myself scratching my head wondering how to whip up something it normally took me a few minutes to make. I'd like to say that it's developed my problem solving skills even more.

"All I need is a piece of wood or plastic a few millimeters thick with slots and holes," I thought. Simple, really. Popsicle sticks would totally work, but I'd have to go out and buy them and I wanted something a little more durable.

And then I had that ureka moment: "I HAVE SHRINKY DINK SHEETS!" (I literally said it aloud and woke up a sleeping cat.)

Apparently I introduced my boyfriend to the joyful world of Shrinky Dinks. Oh, Mainers. Granted, living in remote Maine, he didn't have access to toy stores like I did growing up in suburban CT, but really? Not grow up with the wonderment of a shirnky dink? So, for those who don't know, they were "kits" with several plastic sheets of your favorite Disney/My Little Pony/Transformer, etc characters outlined in black for you to color in. Using the provided colored pencils, you'd color a little life into the outlines. Then, when baked in the oven, they would magically shrivel up and flatten out into little half-pint versions of their original selves. I have found memories of my face planted next to the oven window watching in amazement as they transformed.

Apparently now they come complete with dioramas. Which makes sense. I mean, what did I do with those little things once shrunk? Stuck them to the windows only to be forgotten about and then thrown out by a parental unit. Great, I just gave myself 'recycler's guilt'.

Okay, enough. If you're interested in how I made a paddle out of "shirnky dink" material, feel free to check out my instructions below!
DIY Weaving Paddle

You'll need:
- One 10.5"x 8" sheet of shrinky dink plastic** [it's polystyrene (PS, #6 recycle symbol) for you nerdy types]
- My template (or you can use your own)
- Exacto blade
- straight edge
- hole punch
- cardboard (I used the back of a legal pad)
- 400 grit sandpaper
- alcohol and cotton ball
- markers or color pencils to decorate (optional)
**Polystyrene will shrink roughly to 45% of it's original size, so just be conscious of that if you're using your own template or if you don't want to buy shrinky dink sheets and use a muffin container with a #6 recycle symbol that isn't quite as big as I used. 
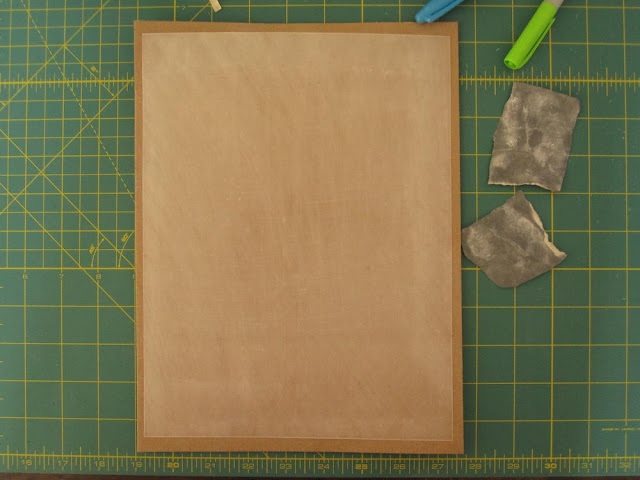
1.) Rough up both sides of the sheet with sandpaper. I do this because I don't like the way the pastic feels after shrinking. (I'm weird when it comes to tactile things! Why do you think I like fiber?!) It also helps when adding any sort of color or markings, not to mention it reduces the static electricity issue of super smooth plastic. Stuff will stick to it and then it gets baked in and then it's just gross.

2.) Remove excess dust with alcohol and a cotton ball. If there are bits of dust they'll melt in when shrinking. Not cool.

3.) Print out template - make sure you print it at 100%, or else the scaling will be off when you go to shrink the plastic. Tape the piece to the template. (Ignore the fact that I started to trace - totally realized that was unnecessary after I taped the template on!)

4.) Starting with the small holes, cut out the holes and slots with the exacto blade and straight edge. If you do all the long slots first, it'll be super difficult to cut out the smaller ones between.

5.) Punch out edges of slots and holes with the hole punch. This relieves the stress at the corner of the squares and keeps the plastic from tearing. [Nerd fact #2 in this DIY.]

I was feeling punchy.

6.) Decorate if you'd like.

Now comes the fun part.

7.) Heat oven to ~310 degrees. (Anywhere between 300-350 deg is fine.) Place plastic sheet on a piece of cardboard and place in oven.

8.) Watch as it shrinks! (Sorry I don't have pictures!) It will curl up and get all wonky, when it does this DO NOT FUSS WITH IT.  Don't worry it'll flatten out. I swear. If for some reason it sticks to itself - it should correct itself, you just have to wait - but if not take it out and release it, pop it back in the oven and let it finish.

9.) When it's all shrunk down and flattened out you know it's done. Take it out and evaluate if you need to push the slots together (they might be skewed a little). You now have my permission to fuss with it. If it hardens before you have a chance to fix it, just reheat in oven until pliable.

And voila!

Shearing Day

Last Thursday I went to Connecticut to witness a sheep and alpaca shearing. It was amazing. My mother knows a woman who's family owns a mobile petting zoo. What an sweet idea! They travel around Connecticut doing children's birthday parties, visit nursing homes and other events. They were kind enough to offer me whatever fiber I wanted. How cool is that?!

getting ready for a trim!

Jay from Mariacher Shearing was there and sheared 2 alpaca and 5 sheep. I think if he hadn't actually humored me and answered all my questions he could have done it in under an hour. But we all couldn't stop gabbing. He was quite knowledgable, considering he's been doing this for a very long time and shears over 2,000 animals in a year (I think it's actually closer to 4,000+, but I could be wrong).

the fleece comes off all in one "piece"

What I found most amazing was that the sheep didn't put up much of a fight. I suppose you can't if you're sitting on your bum with your legs in the air, and I'm sure they were nervous, but whatever.

all done!
After all is done, the fleece comes off in one piece and looks like this:

He was kind enough to skirt the edges for me, which basically means he got rid of all the nasty matted fiber and the stuff that was too short to do anything with.

Sheep produce a substance called lanolin which, we think of as a grease but is actually a wax. This does a variety of different things for the sheep, including keeping the sheep dry in wet weather. It looks and feels like an expensive tan colored grease-hand-lotion-like product which coats the entire fleece. I was amazed at just how much was present. But wow did it make my hands feel supple and soft and was surprised I couldn't detect an odor. Since it was a chilly day, once off the animal the lanolin would harden almost instantly. Between sheep, the shearer had to chip the lanolin off the shearing head with a  sharp tool. If he didn't, the clippers would clog to the point of not working.

In the end, I ended up taking two fleeces. One is from - wait for it - the lone black sheep of the family:

the matriarch of the small flock
The other I took is a super silky Cotswold mix:
Who's a pretty girl??

Unfortunately, I don't have any good pictures of the alpaca shearing. He did them first and I was so in awe that I forgot to take pictures. I took the fiber from those too. How soft and lustrous! I'm excited to learn how to spin it all!